Okay, WooCommerce store owners. Get ready to jump for joy because we just leveled up our WooCommerce integration.
Today, we’re unveiling Deep Data for WooCommerce with Sendlane!
What is this new feature? How does it benefit you? How can you start using it?
Well, first and foremost, one HUGE win with our integration is that you can connect multiple WooCommerce stores.
That’s right.
Unlike a lot of other email marketing platforms, we’re not going to hinder you with a store limit.
Your goals and dreams are bigger than that and we want to help them flourish.
Oh, and there’s more.
A lot more.
We’re going to explain everything in our post and soon you’ll be feeling like Jack Skeleton when he discovered Christmas.
How This New Feature Will Benefit You
Integrating with WooCommerce isn’t new to Sendlane. We’ve had an integration for quite a while now, but we’ve made it even better.
With this Deep Data integration for WooCommerce, you can now start passing along all the important data from your WooCommerce store back to Sendlane.
How does that help you?
Well, now you can use all that delectable data to help you track, segment and personalize your customer’s experience with your brand on a more granular level.
You read that right.
This new integration lets you leverage ALL your WooCommerce data.
Let’s talk a little bit more about that, shall we?
What kind of data are we talking about here?
Before, our WooCommerce integration mainly passed through basic data — like name and email address.
However, this upgrade lets you reach deeper into your pool of WooCommerce data and transfer it over to Sendlane.
Now, you can gather data such as:
- Each subscriber’s Lifetime Order Value (LTV)
- All customer transactions
- Purchased items
- Revenue per order
- Their activity like when they signed up, and what they’ve been looking at on your site
- What list they’re on
- If they’ve abandoned their shopping cart
- What pages they’ve visited
- How long it’s been since their last order
Did you catch that last one? Yeah, that’s a big one.
Not only can you now see your WooCommerce customer interactions through your site, but you now have access to new segmentation options, automation triggers and pre-built automations too.
Let’s look at all of those a bit closer.
Segmentation Capabilities for WooCommerce
We’ve created WooCommerce-specific segmentation capabilities to give you the ability to bracket off your audience so you can personalize every email.

In your Sendlane account, when you go into Segments, you can choose WooCommerce from the dropdown menu inside the gray box area. Once you've done that, then choose the desired WooCommerce store to start things off with.
From there, you’ll have a few options:
- Select Resource
- Select Filter
- Select Operator
- Order Status
- Select Value
- Date
In the Resource dropdown, you have these options: Customer, Checkout and Order.
Depending on what you choose here, the below options will change accordingly. For instance, with the “Customer” option, you segment could look like this:
Resource: Customer → Filter: Average Order Value → Operator: is greater than → $XXX
That’s one potential segment you can create. Another example would be if you chose “Order” your segment could look like this:
Resource: Order → Order Status: Order Placed → Filter: Product ID → Operator: Contains → Value: (item number)
As you can see, choosing this structure gives you a different set of segmentation options but the end result is just as powerful.
With the first, you can sort customers of your WooCommerce store by Average Order Value of a certain amount. And the second sorts your list by products they’ve ordered so you can cycle back to them with an eventual upsell to a complementary product.
Segmentation is only one part of better email marketing for your eCommerce store. That’s why we’ve also added better automation triggers so you can give customers a more customized experience.
WooCommerce Automation Triggers
Email Marketing automation is the name of the game with eCommerce, but to get those to work you need your platform to recognize important behaviors that even trigger the automation.
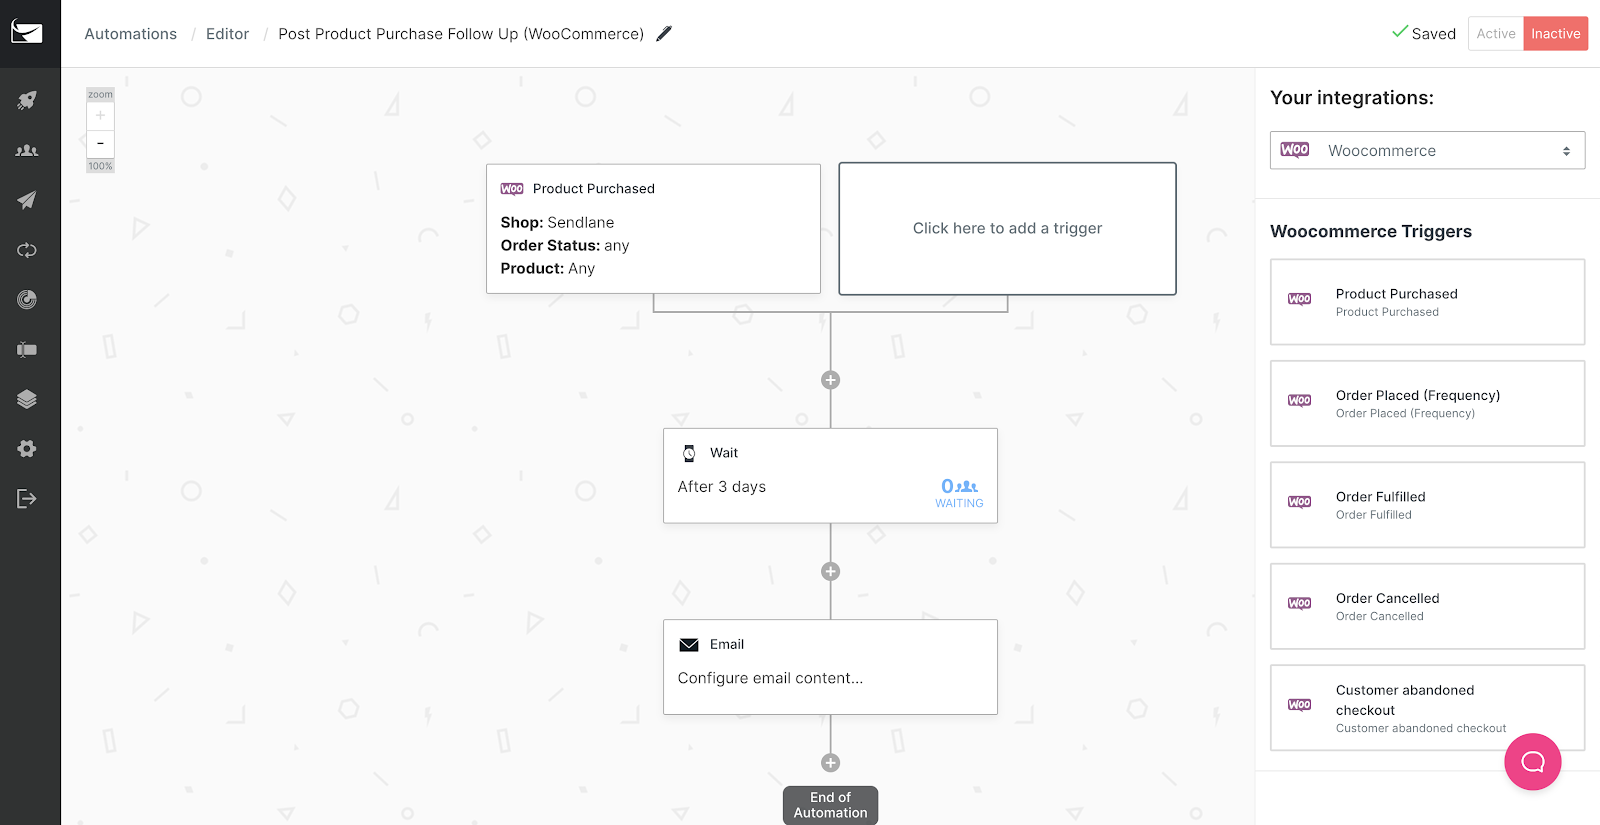
When you login to your Sendlane dashboard and get into your automations, you’ll find the options to choose your WooCommerce integration.
From there, you have five WooCommerce-specific triggers that you can customize to your automation needs:

- Product Purchased
- Order placed (Frequency)
- Order Fulfilled
- Order Canceled
- Customer Abandoned Cart Checkout
Within some of those triggers you’ll have options to adjust to your needs.

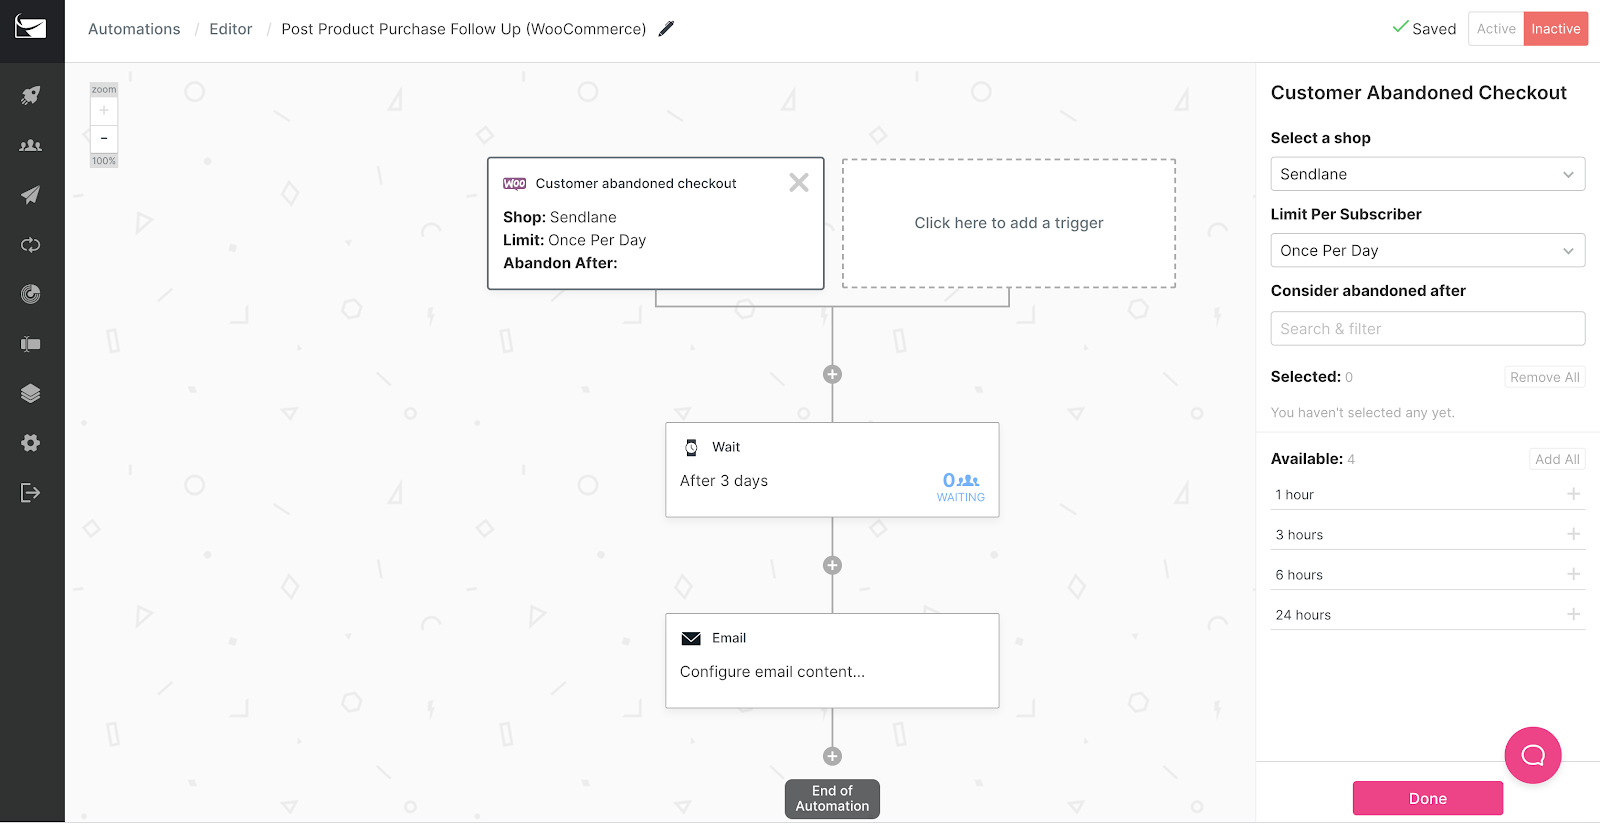
For instance, if you choose the abandoned cart trigger, you have can choose how often a subscriber can be put into this automation:
- One time only
- Once a day
- To not trigger if they’re already in an automation
- No limit to how many times they get put into this automation
Once you select that, you can choose how long to want to wait before their actions are considered as the trigger to the automation:
- 1 hour
- 3 hours
- 6 hours
- 24 hours

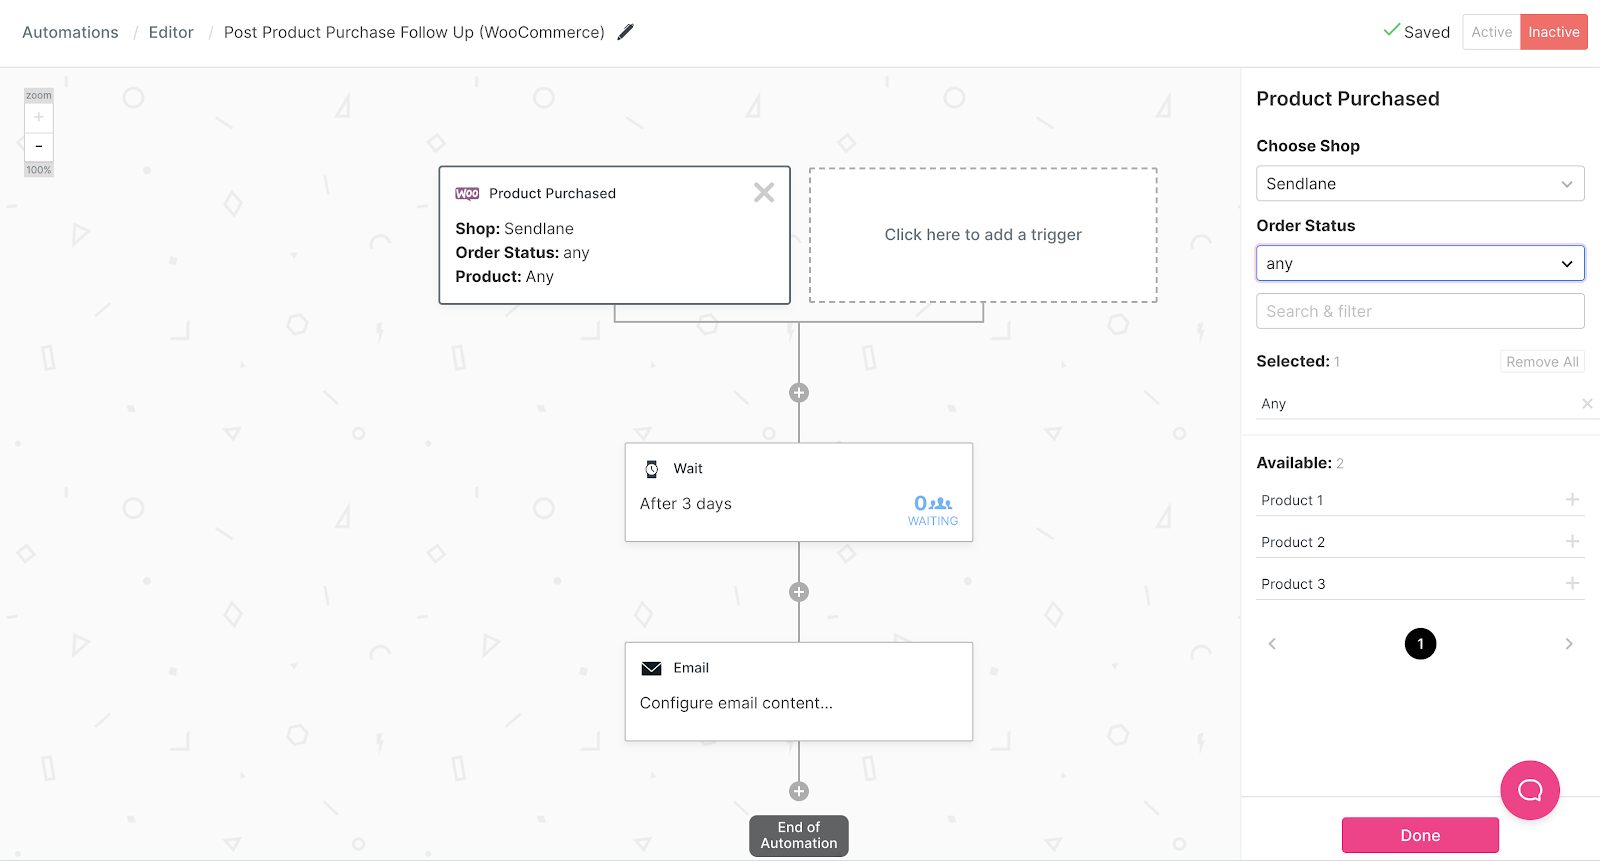
The Product Purchased trigger is another one that has more options to it. In the Order Status dropdown you can choose from the following:
- Completed
- Failed
- On-hold
- Pending
- Processing
- Refunded
- Any
Then you can select what products this trigger applies to. All of the triggers and any options given put a lot of power into your hand as far as email automations for your WooCommerce store go.
There are quite a few different types of automations you can build for your store within Sendlane.
Below are a few examples of revenue driving automations you can now easily create with our WooCommerce update.
3 WooCommerce Automations You Can Now Do
Not only do you now have greater access to your data, but you can also use the behavior-based actions of your customers to trigger automations
1. Abandoned Cart
Yeah, we’re pretty excited about this one too.
We know how vital it is for online stores to be able to recover their abandoned carts, and our new Deep Data WooCommerce integration will help you do just that with this new workflow.
Go ahead. Do a little fist pump.
To set this up, you first need to download this WooCommerce plugin for Sendlane. Next, follow the instructions found in this article to make sure your plugin is connected correctly to your account.
After that, go to your account and click on Automations. Click on New Automation in the top right corner, select eCommerce in the popup menu, and choose Cart Abandonment (WooCommerce).
This is a prebuilt marketing funnel with all the basics to help you get started. So feel free to tweak the workflow to suit your needs.
For example, after someone abandons their cart, you can wait for something like 24 hours and send them an email about it. You can go further than that though.
If the person opens the email but doesn’t make a purchase, then that action can trigger another email.
And if that doesn’t work, then to wrap up this automation you could wait another day or two and send another email or SMS text to them with a coupon code to help convert cart.
Again, that’s just an example of what you can do. There are plenty of other ways you can fine-tune this, but the important thing to remember is that now it’s an option!
//[inject:ad-ebook-abandoned-cart]
2. Post-Purchase Follow Up
People who buy from you are 72% more likely to purchase from you again. However, you can help that along if you’re keeping the conversation going.
This Post-Purchase Follow Up for WooCommerce funnel helps you stay in touch with your customer, but can help you gain additional revenue from the ones most likely to convert again.
After someone makes a purchase, you can send them an email thanking them for their purchase.
Within the email, you can offer them a coupon on their next purchase. But you can build this funnel out to make the most of this new purchase.
Right away, you can make sure this person is added to a custom audience on Facebook so you can retarget them with campaigns later.
You could then wait a few days and send another email or SMS message asking them to follow you on social media or share a popular blog post from your site. To wrap it up, you could send a final email offering them free shipping on their next purchase.
There are certainly other ways to do this, but now that the option is here, you can use it to help you scale your store.
3. When An Order Is Canceled
Sometimes it happens.
A customer finds products, then adds them to their cart and orders them only to come back a little bit later and request a cancellation of their order before it’s fulfilled.
But just because they canceled doesn’t mean you need to let that opportunity die right then and there. You can use this event to trigger a workflow with the aim of getting them back.
After this event is triggered, add a tag to create a segmented list of these ones.
Then you could wait a few hours and send an email saying you’re sorry to see them go and offer them a chance to tell you why they canceled their order — maybe with a quick email reply or in a linked Google Form.
This would give you a better understanding of why this could be happening to see if you need to make any changes with your site’s function or in your marketing.
A few days later, you can send an email offering them a coupon to bring them back to your store.
//[inject:ad-demo]
More data, more options, more revenue
This integration is designed to give you access to more of the things that will help drive your WooCommerce store forward.
The longer you use this integration, the more data you can start to pull from your site into Sendlane, and the more ideas you can get for workflows, tags, and various segmentations.
All of the above mentioned workflows are designed to keep the conversations going with your audience and to help you gain more revenue in areas where you could have holes in your current funnel.
It’s just one more way we’re designing our platform to grow with you. Are you ready to get this integration up and running? Here’s how.
Connecting WooCommerce to Sendlane
This integration is an update to our previous WooCommerce connection. So if you have your WooCommerce store connected already, you simply need to update your current connection.
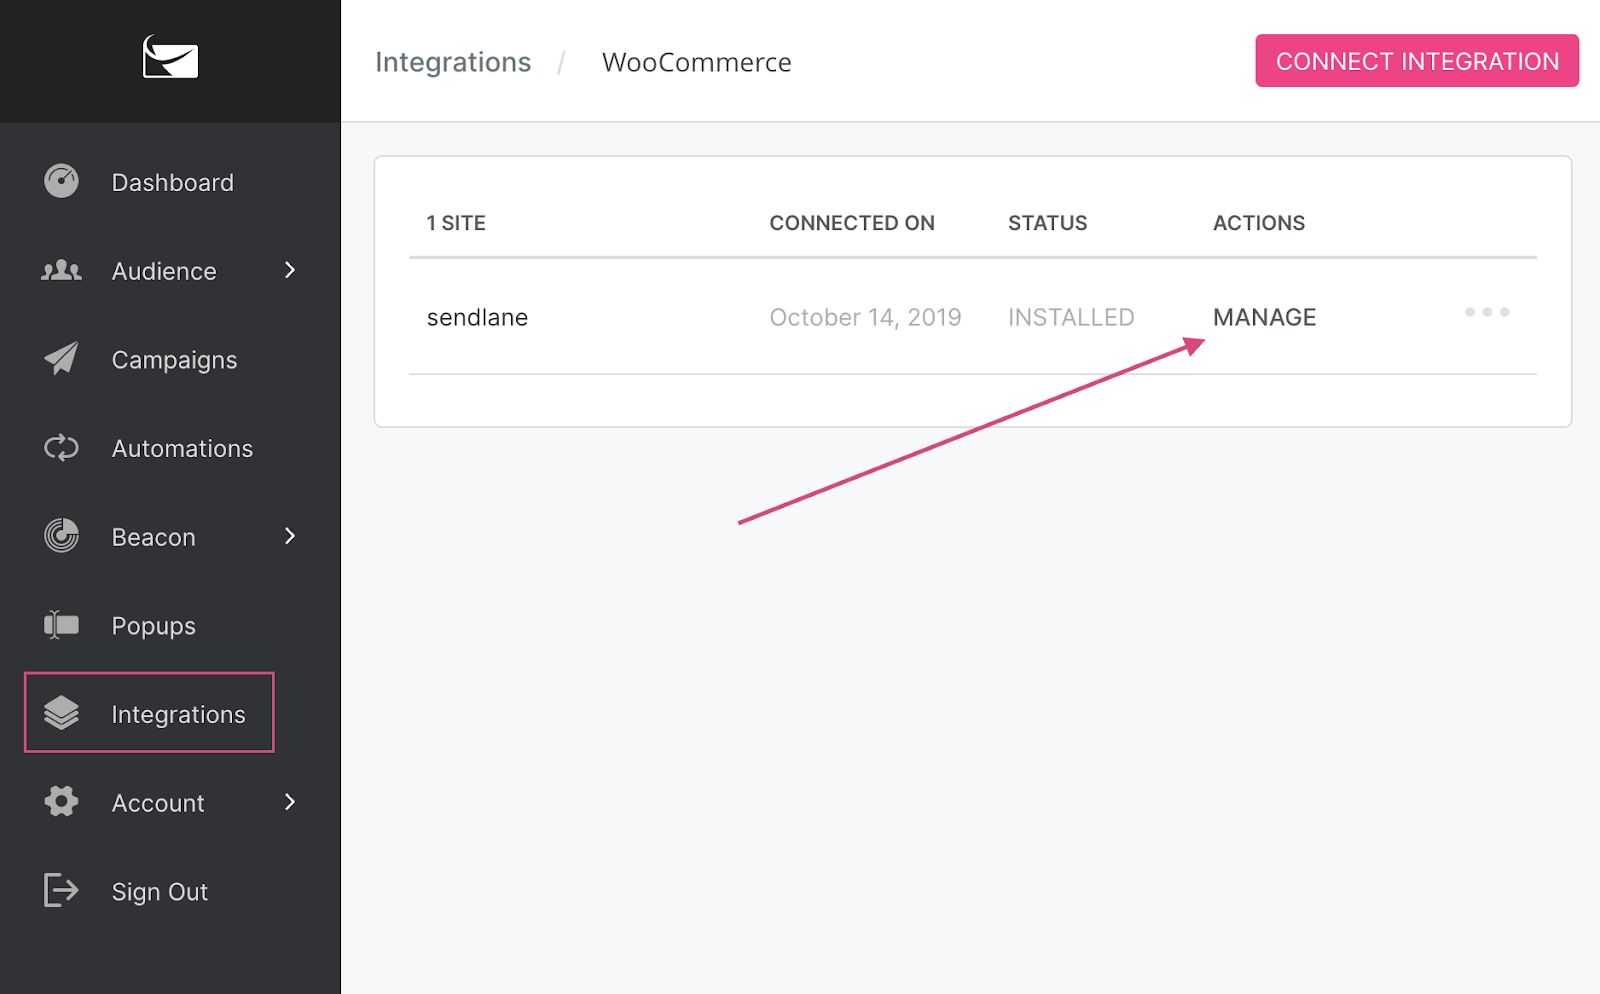
To do that, log in to your Sendlane account, go to Integrations, then Installed, click the button Configure.

You should see a dashboard like the one above. Find the shop integration that you want to reconfigure, click on Manage, and then configure your shop settings one more time.Hit the Continue button, and you’re all set.
If you haven’t set up this integration yet, you can go right here to learn how to connect your WooCommerce store to your Sendlane account. Or learn more about Email Marketing for WooCommerce here!
Deep Data for WooCommerce Is Now Available!
We’ve put a lot of work into getting this integration ready for you, and dare I say it’s quite Woo-nderful. (See what I did there?)
As of today, this integration is live in all Sendlane accounts. (it’s included!) Feel free to login to get started!
If you haven’t signed up for Sendlane, feel free to grab a free 60-day trial and give this new integration a whirl.


%20(1).avif)


%20(1).avif)
%20(1).png)
.avif)


.avif)
.avif)


.avif)


.avif)


.avif)


.avif)


.avif)

.avif)
.avif)

.avif)
.avif)

.avif)

.avif)


.avif)
.avif)
%20(1).avif)
.avif)


.avif)


.avif)
.avif)

%20(1).avif)

%20(1).avif)


.avif)


.avif)


.avif)


.avif)


.avif)


.avif)

.avif)

.avif)
.avif)


.avif)


.avif)

.avif)


.avif)


.avif)


.avif)


.avif)

.avif)

.avif)
.avif)

.avif)
.avif)

.avif)

.avif)

.avif)


