Co-creating emails with designers, strategists, and copywriters can take your campaigns from good to great. But too many people working on a project can quickly get messy.
Enter: Sendlane’s new user permissions and roles.
Our latest product update lets you give varying access to multiple team members. The result? Streamlined, hassle-free collaboration!
Let’s find out how to use roles and permissions in Sendlane.
But first…
Why are user permissions important?
Limiting access for specific users gives more control to admins, making it easier to protect sensitive data and delegate tasks.
For example, you might work with contractors you don’t want to share high-level account and revenue data with. Editing user permissions minimizes the risk of someone exporting your contact list or changing billing information!
Or, you might want only managers to send campaigns after approving copy and design. In that case, you’d want to limit access for designers and writers so they can only work on drafts.
What user roles are available?
Sendlane lets you assign roles to new users with preset permissions. Below are the roles you can choose from:
- Owner: The main admin who receives billing and account emails. The owner cannot be changed inside the app.
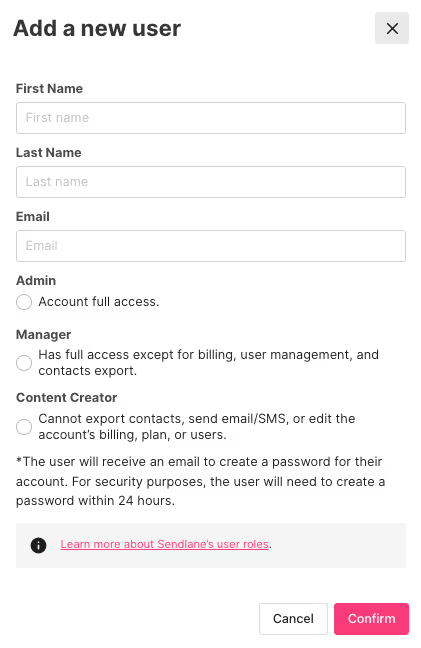
- Admin: An administrator has full account access. They can export contacts, send campaigns, add new users, and edit user permissions.
- Manager: Managers have full access except for changing billing, managing users, and exporting contacts. They can send email and SMS campaigns.
- Author/Content Creator: This role is for writers, designers, and contractors. Content creators cannot change billing, manage users, export contacts, or send campaigns. They can only edit and save campaigns as drafts.
//[inject:ad-demo]
How to set up user roles and permissions in Sendlane
Log in to your Sendlane account, or create an account if you don’t already have one!
Next, follow the steps below to set up roles and permissions for new and existing users:
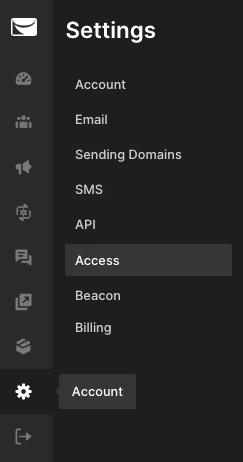
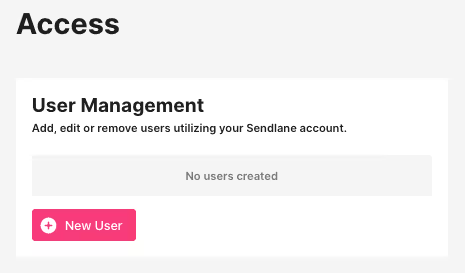
1. Click on Settings from the left-hand sidebar and select Access. Here, you’ll be able to see the existing users in your Sendlane account and their current roles.

2. Edit an existing user’s permissions by clicking the pencil icon. Or tap on New User to add a new user to your account.

3. Fill out basic user information — first name, last name, and email address. Then, select a user role from the three available options: admin, manager, and author.

4. Click on Confirm to add the new user or save edited user information.
Collaborate on emails easily with roles and user permissions
Sendlane’s user permissions make remote collaboration a breeze!
Bring employees and contractors to work together on email campaigns without worrying about losing sensitive data or dealing with unwarranted changes.
Better yet, have a solid approval process in place, so your emails are always top quality!
Ready to try it yourself? Sign up for Sendlane’s 60-day free trial and start streamlining your projects management.


%20(1).avif)


%20(1).avif)
%20(1).png)
.avif)


.avif)
.avif)


.avif)


.avif)


.avif)


.avif)


.avif)

.avif)
.avif)

.avif)
.avif)

.avif)

.avif)


.avif)
.avif)
%20(1).avif)
.avif)


.avif)


.avif)
.avif)

%20(1).avif)

%20(1).avif)


.avif)


.avif)


.avif)


.avif)


.avif)


.avif)

.avif)

.avif)
.avif)


.avif)


.avif)

.avif)


.avif)


.avif)


.avif)


.avif)

.avif)

.avif)
.avif)

.avif)
.avif)

.avif)

.avif)

.avif)


